Deployment Isn't a Moment, It's a Pipeline: Automating Your ML Rollouts

You've built more than you might realize…
Across the previous three lessons, you've assembled the pieces of a real ML deployment: a reproducible project, a containerized service, and a versioned model registry. Each one solves a specific problem. Together, they're most of what a production ML system actually looks like.
What's missing is the thing that ties them together automatically.
Right now, if you make a code change or promote a new champion model, you have to manually rebuild the container, push it somewhere, and update the running service. Every step by hand. Every deployment a small ritual. And every ritual is a place where something can go wrong: a test that didn't get run, a model that didn't make it into the container, a config that silently drifted from production.
The fix is a pipeline: an automated system that watches your code and your model registry, decides what needs to happen, and does it for you. Push code, promote a new champion model, and the pipeline takes it from there. Environment installs. Tests run. Container builds. Deployment happens. All hands-off.
This is what teams mean when they say "CI/CD."
Let's get to it!
Why manual deployment breaks (and why CI/CD isn't optional for ML)
Here's what deploying a model update looks like without a pipeline in place:
- Retrain the model locally
- Save the new artifact
- Rebuild the Docker container with the new model inside
- Push it to a registry
- Update the running service (through a console, an SSH session, or a cloud CLI)
- Watch logs for a while, hope nothing broke
It works. Sort of. Until one of these happens:
- You forgot to run the tests before rebuilding
- The new model artifact never actually made it into the container
- A worse model got deployed to production because there was no automated check to block it
- You have no automated record of what was deployed when, from which commit, or tied to which model version
- You can't roll back to a previous deployment without redoing the whole manual process from memory
Some of these are silent: the service is running, the endpoint responds, but the predictions are wrong or stale, and nobody notices for hours or days. Others only bite when you need them: a rollback that isn't there, an audit trail that doesn't exist. Both categories are why manual deployment doesn't scale.
The alternative is a pipeline that automates the whole loop for you. So what does that actually mean, and how does it apply to shipping ML?
What CI/CD actually is (in ML terms)
A CI/CD pipeline is simpler than the acronym makes it sound.
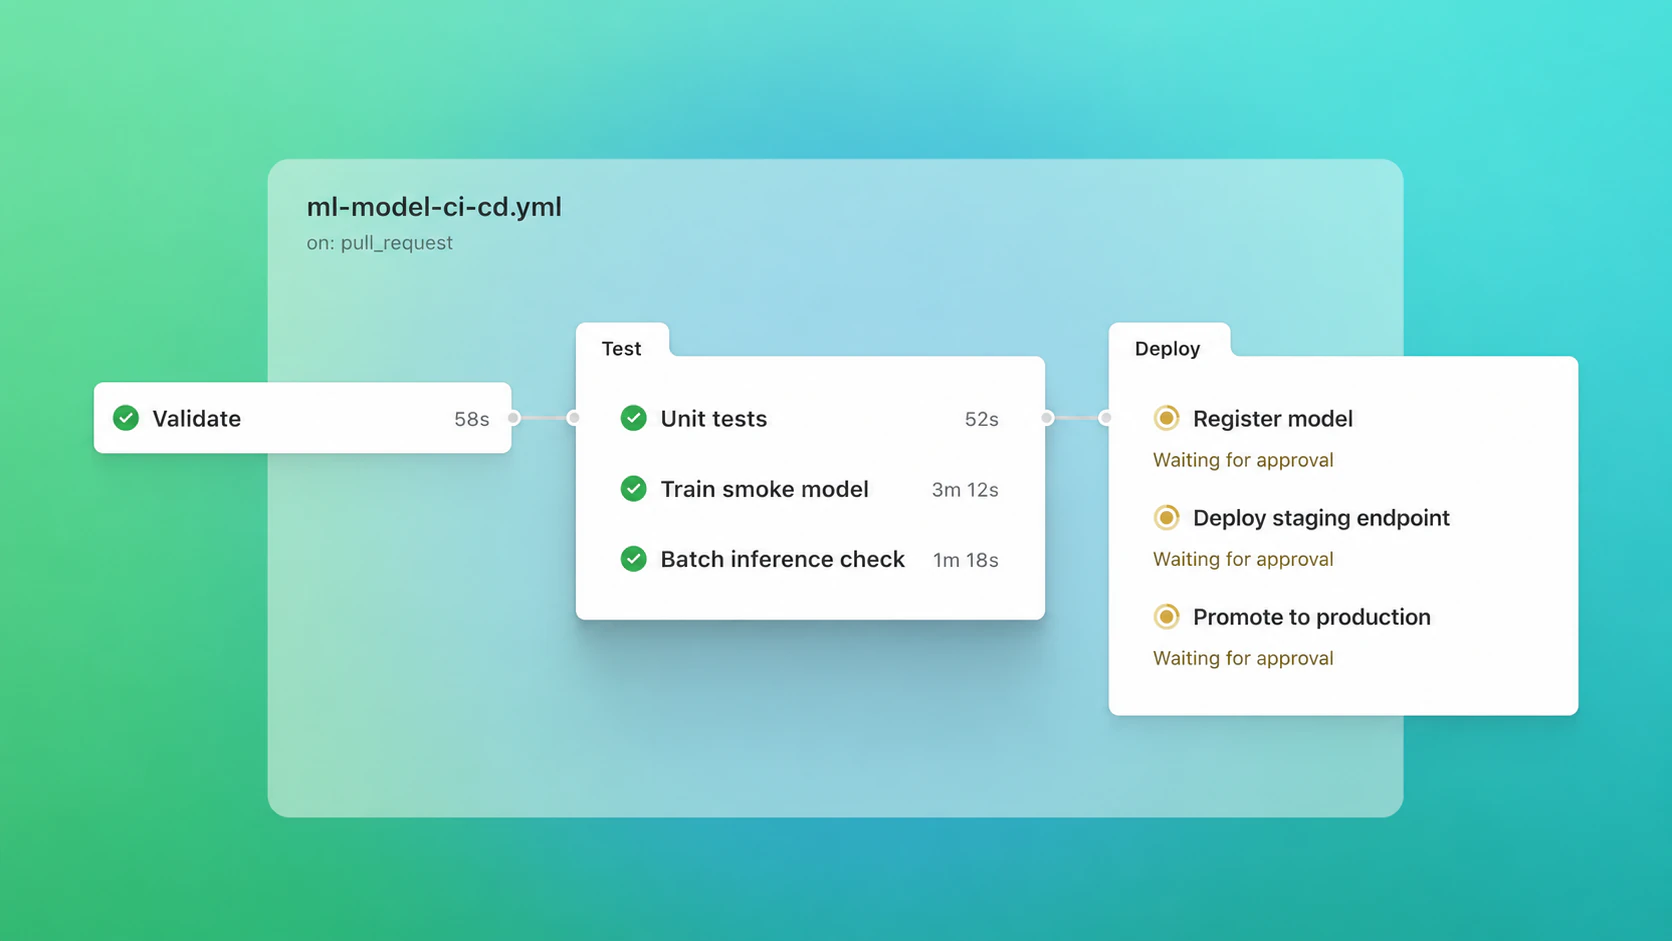
It's an automated system that watches your code (and, for ML, your model registry). Every time something changes, the pipeline runs. It goes through two phases in order:
- First, it checks the change is safe: Run the tests, install the environment, verify the container builds, catch any obvious problems. If any of this fails, the pipeline stops and tells you.
- Then, if the check passed, it acts on the change: Build the deployment artifact, push it to a registry, update the running service, verify the new deployment is healthy.
The first phase is called Continuous Integration (CI). The second is called Continuous Deployment (CD). Together they form a pipeline: code change → tests → build → deploy → healthy service. All triggered automatically. All logged. All repeatable.
The ML-specific twist: your pipeline should also react to changes in your model registry (from Lesson 3). When a new version gets promoted to @champion, the pipeline should redeploy the service, even if no code changed. This is what distinguishes ML CI/CD from software CI/CD, and it's why we spent Lesson 3 setting up the registry the way we did.
Where CI/CD actually runs: GitHub Actions
A pipeline needs somewhere to actually run. That's what CI/CD runners are for. There are several to choose from: GitHub Actions, GitLab CI, CircleCI, Jenkins, Argo Workflows, and more. Which one your team uses mostly depends on where your code already lives. If it's on GitHub, GitHub Actions is the natural fit: it lives alongside your code, requires no extra service to set up, and is free for public repos (or generous for private ones on the free tier).

It's config-as-code: Your entire pipeline lives in a .github/workflows/ folder in your repo. That means the pipeline is versioned alongside your code. When you check out a commit from six months ago, you get the pipeline that was running then, not the pipeline you have now.
We'll use GitHub Actions in this lesson because most data scientists have their code on GitHub. If you're on GitLab or something else, the syntax will differ but the underlying concepts (triggers, jobs, steps, artifacts) transfer directly.
Building your first ML CI pipeline
Let's build a working CI workflow for the project you've been building across Lessons 1-3. This is the pipeline that runs every time you push code.
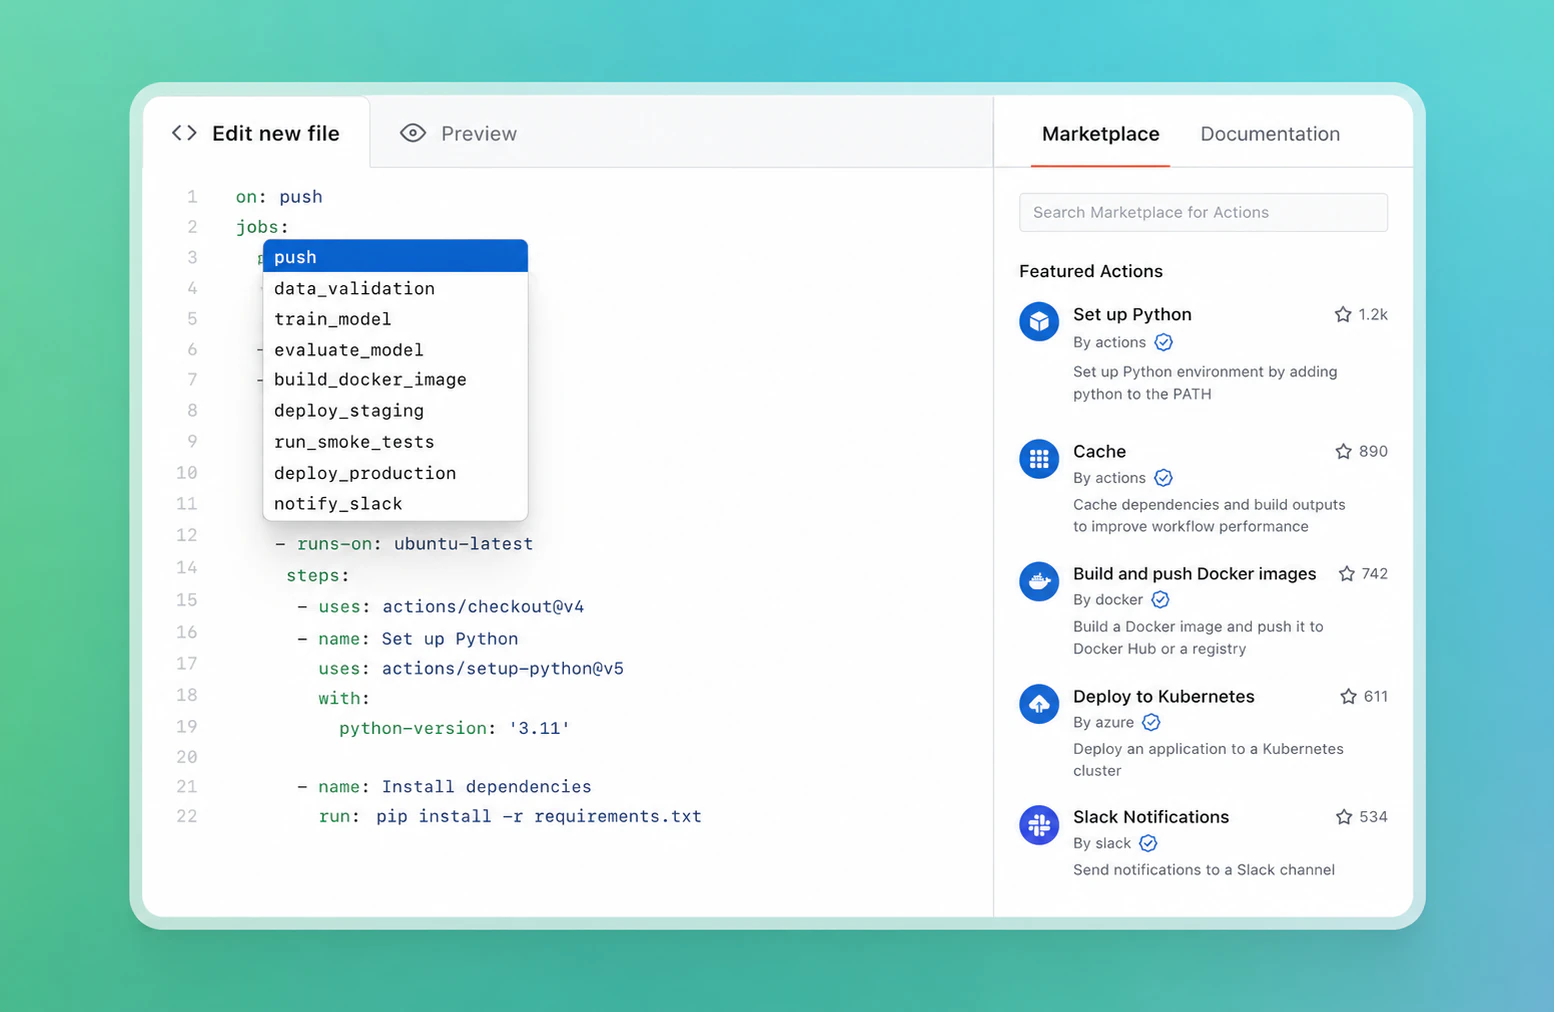
Step 1: Create the workflow file
GitHub Actions looks for workflow files in .github/workflows/. Create that folder in your project root, then create a file called ci.yml inside it.
your_project/
├── .github/
│   └── workflows/
│       └── ci.yml
├── src/
├── tests/
├── pyproject.toml
├── uv.lock
├── Dockerfile
└── ...
Step 2: Write the CI workflow
Here's the minimum viable CI pipeline that installs your environment, runs your tests, and confirms the Docker container builds:
name: CI

on:
  push:
    branches: [main, develop]
  pull_request:
    branches: [main]

jobs:
  test:
    runs-on: ubuntu-latest
    steps:
      - name: Check out code
        uses: actions/checkout@v4

      - name: Install uv
        uses: astral-sh/setup-uv@v8.3.2

      - name: Set up Python
        run: uv python install

      - name: Install dependencies
        run: uv sync --frozen

      - name: Run tests
        run: uv run pytest tests/

  build:
    runs-on: ubuntu-latest
    needs: test
    steps:
      - name: Check out code
        uses: actions/checkout@v4

      - name: Build Docker image
        run: docker build -t churn-service:${{ github.sha }} .

      - name: Smoke test the container
        run: |
          docker run -d --name test-container -p 8000:8000 churn-service:${{ github.sha }}
          sleep 5
          curl -f http://localhost:8000/health || exit 1
          docker stop test-container
A few things worth noticing:
on:: defines when the pipeline runs. Here, on every push tomainordevelop, and on every pull request targetingmain.jobs:: the pipeline has two jobs (testandbuild) that run in sequence becausebuildhasneeds: test. If tests fail, the build never runs.uses: astral-sh/setup-uv@v8.3.2: installs uv on the GitHub runner. This is the Lesson 1 payoff: because you standardized on uv, the CI environment matches your local environment.uv sync --frozen: installs the exact dependencies from your lockfile. Same versions as your laptop. No drift.- The smoke test: builds the Dockerfile from Lesson 2, starts it, hits the
/healthendpoint, and confirms it responds. If the container is broken, this catches it here rather than in production.
Step 3: Push and watch it run
Commit the file, push it, then go to the Actions tab in your GitHub repo. You'll see the workflow running. Click into it to see each step execute in real time.
If your tests pass and the container builds, you'll see a green checkmark. If anything fails, GitHub tells you exactly which step and why. This is your safety net now.
💡 Try breaking it on purpose: Change a test to fail, push the commit, and watch the pipeline block the merge. That's the moment CI stops feeling abstract and starts feeling like an actual teammate.
Adding CD: automating the actual deployment
CI catches problems. CD does something with the artifact once it's clean. Let's extend the pipeline so that when code lands on main, the container gets pushed to a registry and the deployed service picks up the new version.
Add a deploy job to your workflow:
  deploy:
    runs-on: ubuntu-latest
    needs: build
    if: github.ref == 'refs/heads/main'
    steps:
      - name: Check out code
        uses: actions/checkout@v4

      - name: Log in to container registry
        run: echo "${{ secrets.REGISTRY_TOKEN }}" | docker login ghcr.io -u ${{ github.actor }} --password-stdin

      - name: Build and push image
        run: |
          docker build -t ghcr.io/${{ github.repository }}/churn-service:latest .
          docker push ghcr.io/${{ github.repository }}/churn-service:latest

      - name: Trigger deployment
        run: curl -X POST ${{ secrets.DEPLOY_WEBHOOK_URL }}
Two important things happening here:
if: github.ref == 'refs/heads/main': this job only runs when code lands onmain. Pull requests get CI (tests + build) but not CD (no deployment). This is the standard pattern for keeping production safe.secrets.REGISTRY_TOKENandsecrets.DEPLOY_WEBHOOK_URL: these come from GitHub's secrets store, configured through the repo settings. Never put credentials directly in the YAML file.
The Trigger deployment step is intentionally simplified. In practice, this looks different depending on where you're deploying: it might be a webhook to Cloud Run or Render, an aws ecs update-service command, a kubectl apply, or something else entirely.
Triggering deployment when a model gets promoted
Here's the ML-specific extension. Add a workflow that runs when a new champion model gets registered in MLflow:
name: Model Promotion Deploy

on:
  repository_dispatch:
    types: [model-promoted]

jobs:
  deploy:
    runs-on: ubuntu-latest
    steps:
      - name: Check out code
        uses: actions/checkout@v4

      - name: Rebuild and redeploy
        run: |
          docker build -t ghcr.io/${{ github.repository }}/churn-service:latest .
          docker push ghcr.io/${{ github.repository }}/churn-service:latest
          curl -X POST ${{ secrets.DEPLOY_WEBHOOK_URL }}
This workflow triggers on a custom event (model-promoted) that you fire from your MLflow tracking server (or from a script that runs after promotion). When it fires, the same deploy logic runs, no code change needed. Your service picks up the new champion model on its next start.
This is the loop closing across the whole series: a change in the model registry (Lesson 3) triggers a deployment pipeline (Lesson 4) that rebuilds the container (Lesson 2) using your locked-down environment (Lesson 1). Nothing manual. Nothing forgotten.
A quick map of where to deploy
The pipeline builds and pushes the container. But where does the container actually run? That depends on your setup, and there are more options than you probably realize. Here's a brief map of what's out there:
- Cloud-managed container services: AWS ECS Fargate, GCP Cloud Run, Azure Container Apps. These are the easiest starting points for solo work or small teams. You point them at a container image and they handle the rest (autoscaling, load balancing, restarts).
- Kubernetes: EKS, GKE, AKS. Powerful and flexible, but real overhead. Usually chosen by larger orgs that already have Kubernetes running for other reasons.
- Serverless with containers: AWS Lambda with container images, Cloud Functions Gen 2. Good for low-traffic services where you want to pay per request.
- ML-specific platforms: SageMaker Endpoints, Vertex AI Endpoints, Databricks Model Serving. These add ML-specific features (traffic splitting, shadow deployments, canary rollouts) but lock you into a vendor's ML stack.
For most solo data scientists and small teams, Cloud Run or ECS Fargate is the pragmatic starting point. They're cheap, they're simple, and they don't require you to become a Kubernetes engineer. If you're at a larger company, use whatever your platform team already runs.
The pipeline you just built works for any of these. The Trigger deployment step changes depending on where you're deploying, but everything upstream stays the same.
Try it on your own
I put together a repo with the churn service and a working GitHub Actions pipeline already wired up: test, build (with a /health smoke test), and deploy. Instead of writing YAML, you fork it and watch a real pipeline run.
- Fork it to your own GitHub account.
- Enable Actions on your fork: open the Actions tab and click the button to enable workflows (GitHub disables them on forks by default).
- Push any small change to
main, then watch the CI run. You'll see three jobs go green in order: test, build, deploy. - Break it on purpose: change a test so it fails, push, and watch the pipeline go red and point at the exact step. Fix it, push again, watch it recover.
Get the pipeline repo on GitHub
The deploy job ships as a safe no-op, so your fork goes green without any secrets. The README shows how to swap it for a real deploy, and there's a second workflow that redeploys when a model gets promoted in your registry: the CI/CD-meets-MLflow link from the last lesson.
That's the moment you stop being someone who trains models and start being someone who ships them.
Final thoughts
Zoom out for a moment. Look at what you've built across the four lessons so far:
- Lesson 1 gave you a reproducible project with a lockfile and structured layout
- Lesson 2 turned that project's model into a callable, containerized service
- Lesson 3 gave that service a versioned model source through the MLflow registry
- Lesson 4 wired up the automation that watches your code and your registry, then rebuilds and redeploys whenever something changes
Each lesson depended on the one before it. Your CI pipeline uses Lesson 1's lockfile to install dependencies. It uses Lesson 2's Dockerfile to build the container. It uses Lesson 3's registry as one of the triggers for deployment. And the pipeline itself is what makes any of it actually work in production.
CI/CD is the invisible layer that separates "I have a model" from "my model reliably reaches users." It's not glamorous. Nobody asks about your GitHub Actions workflow in a job interview. But it's the difference between a real product and a demo.
If you take one thing from this lesson, let it be this: manual deployment doesn't scale, and it doesn't stay reliable. Every step you do by hand is a step you'll eventually skip, forget, or do wrong. The pipeline exists so you don't have to be the reliable one. You get to focus on the model and the problem it solves. The pipeline handles the plumbing.
Every piece is now automated except one: watching what your model does after it's live. That's Lesson 5, where we cover monitoring the deployed model. Because a shipped model that no one watches is broken, whether it knows it or not. That's the final piece of the loop.
If you'd rather do this end to end with support and feedback, take a look at the ML in Production bootcamp.