How to Actually Ship Your Model: FastAPI + Docker for Data Scientists

You've probably felt this friction before…
In Lesson 1, you cleaned up your project structure. Your code lives in src/, your notebooks stay in notebooks/, and everything imports properly. Good.
But right now, that model still only runs on your machine. If someone else wants to use it (an engineer, a product team, an app), they can't. They'd have to clone your repo, install your dependencies, and figure out how to invoke your code. That's not shipping. That's handing them a puzzle.
In this lesson, we close that gap.
Shipping a model, at its core, means putting a working artifact somewhere it can actually be reached. That artifact is a container: a self-contained package with your code and everything it needs to run, sitting on a server, ready to answer requests or run jobs. That's the destination, regardless of whether you're on AWS, GCP, Azure, or anywhere else.
Getting there takes two steps: making the model callable, and packaging it into that container. We'll walk through both in this lesson.
Let's get to it!
When you actually need to "serve" a model
There are two ways models typically run in production. They look similar from the outside but need completely different infrastructure. Which one you're building for decides everything downstream.
Batch inference
Your model runs on a schedule (say, every night at 2am), processes a batch of new data, and writes the predictions to a table. Downstream systems read from that table whenever they need them.
A few examples from real data science work:
- A churn model that runs nightly, scores every active customer, and writes results to a
customer_risktable for the CRM team - A demand forecast that runs weekly, generates predictions for every SKU, and dumps them into a planning dashboard
- A propensity model that runs daily, scores leads, and updates a Salesforce field
The infrastructure here is simple: a scheduler (Airflow, Prefect, cron) triggers your script, your script writes to a database, and you're done. You don't need FastAPI for this. You don't need an API at all. You need scheduled execution and a place to write results.
Real-time inference
Something needs a prediction right now, in response to a specific request, and is waiting for the answer before it can move on.
- A new user signs up, and your fraud model needs to score them before the account is created
- A user types a search query, and your ranking model needs to reorder results before the page loads
- An app sends an image to your classifier and expects a label back within a few hundred milliseconds
The infrastructure here is different. Something has to be listening. Something has to accept the request, run the model, and send a response back, fast. A cron job can't do that. A scheduled script can't do that. You need a service.
A service exposes one or more endpoints: specific URLs that other code can call to get something done. Your model would live behind an endpoint like /predict, and anything that needs a prediction sends a request to that URL.
For the rest of this lesson, we're focused on the real-time case, because it's where most data scientists hit a wall. The tool most teams reach for is FastAPI. It's fast, Python-native, and turns a function into a service with very little code.
Wrapping your model in a FastAPI service
First, what FastAPI actually is: a modern Python framework for building web services. You write ordinary Python functions, and FastAPI turns each one into an HTTP endpoint that other programs can call over the network. It runs behind a lightweight server (uvicorn) that listens for incoming requests and hands them to your functions.
If you've ever pulled data with requests.get(...), FastAPI is the kind of thing sitting on the other end, receiving that call and sending back a response.
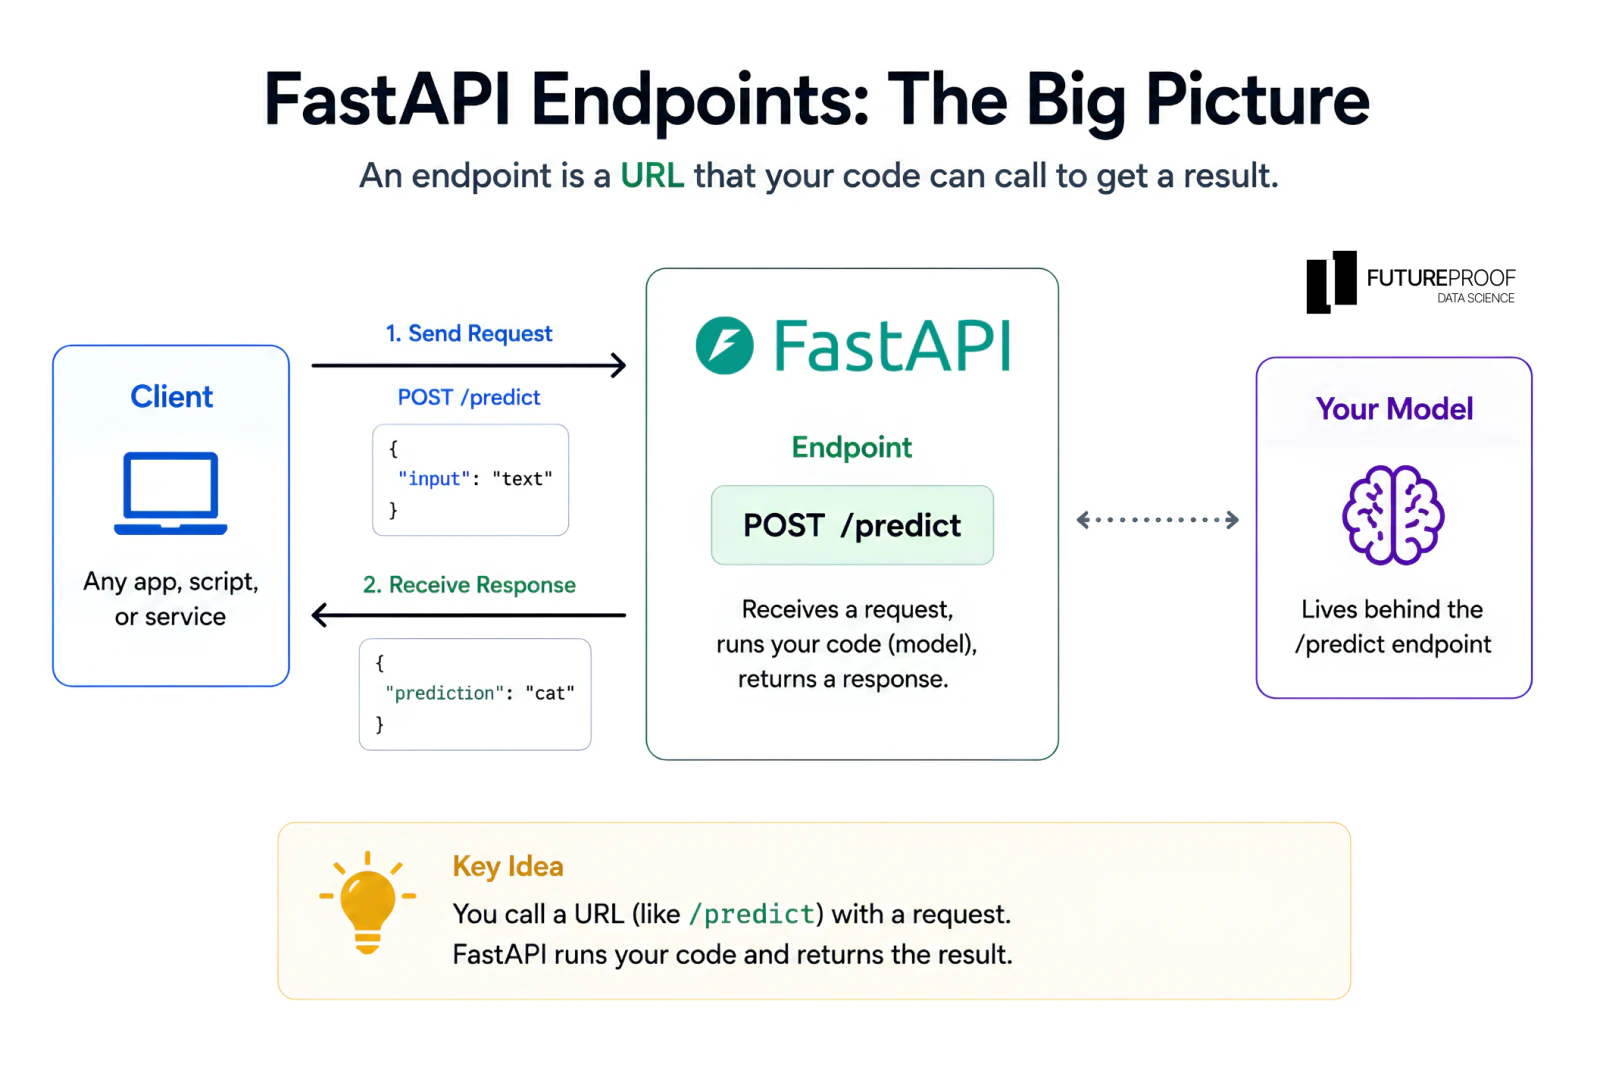
What makes it a good fit here: you get a working, production-ready endpoint from very little code, and FastAPI handles the tedious parts for you, reading the incoming request, checking it's valid, and generating interactive docs. To describe what a valid request and response look like, it uses Pydantic, a small library for defining the shape of your data as plain Python classes. Anything that doesn't match gets rejected with a clear error before it reaches your model.
Let's build the smallest useful thing: a service that loads a model and exposes a single endpoint that returns predictions.
Step 1: Install what you need
From your project directory (the one you set up in Lesson 1):
uv add "fastapi[standard]"One line, three things: fastapi (the framework), uvicorn (the server that listens for requests), and the fastapi command you'll use to start the service. That's what [standard] pulls in. Plain uv add fastapi gives you the framework alone, with no server to run it.
Step 2: Make room for the API
Everything we're about to write goes in one new place. Lesson 1's template is a training project: its Dockerfile runs scripts/train.py, and src/ holds the pipeline. Serving doesn't reorganize any of that. It adds one package:
src/my_ml_project/
├── data.py
├── features.py
├── train.py
├── predict.py
└── api/              # new: everything HTTP
    ├── __init__.py   # empty, but it's what makes api/ an importable package
    ├── main.py       # creates the app
    ├── routes.py     # the endpoints
    └── schemas.py    # what requests and responses look like
Don't skip the empty __init__.py. Without it, the server starts up and immediately dies with No module named 'my_ml_project.api.routes', which is a confusing error for a missing blank file.
That folder is doing more work than it looks. Your pipeline code stays importable by a notebook, a test, or a scheduled job, with no web framework anywhere near it. api/ is the only part of your project that knows HTTP exists, which is what lets the same model serve a live request today and a nightly batch job tomorrow.
Step 3: Define the request and response shapes
Before writing any endpoint logic, define what the service accepts and returns. Pydantic does this.
Create src/my_ml_project/api/schemas.py:
from pydantic import BaseModel

class PredictionRequest(BaseModel):
    age: int
    income: float
    tenure_months: int

class PredictionResponse(BaseModel):
    churn_probability: float
    risk_band: str
That's the contract. The request must have three numeric fields. The response will always have a probability and a risk band. If anything tries to send a request that doesn't match, FastAPI rejects it with a clear error before your model ever sees it.
Step 4: Build the endpoint
Create src/my_ml_project/api/routes.py:
from fastapi import APIRouter
import joblib

from my_ml_project.api.schemas import PredictionRequest, PredictionResponse

router = APIRouter()

# Load the trained model once, when the service starts
model = joblib.load("models/churn_model.pkl")

@router.post("/predict", response_model=PredictionResponse)
def predict(request: PredictionRequest):
    features = [[request.age, request.income, request.tenure_months]]
    probability = float(model.predict_proba(features)[0][1])

    if probability >= 0.7:
        risk_band = "high"
    elif probability >= 0.4:
        risk_band = "medium"
    else:
        risk_band = "low"

    return PredictionResponse(
        churn_probability=probability,
        risk_band=risk_band
    )
A few things worth noticing:
- The model loads once, when the service starts. Not on every request. Reloading the model per request would be slow and pointless.
- The endpoint takes a
PredictionRequestdirectly as a parameter. FastAPI handles the JSON parsing and Pydantic validation automatically. - The return type is declared (
response_model=PredictionResponse), which means FastAPI also validates the output before sending it back. - The
@router.post("/predict")line above the function is a Python decorator. It tells FastAPI: "this function handles POST requests to the/predictURL." You don't have to understand decorators deeply to use them. Just know that the line abovedef predict(...)is what registers it as an endpoint. APIRouteris just a container for endpoints. You collect routes on it here, and the next file attaches them to the app. With one endpoint that's barely worth the ceremony. By your fifth, it's what keeps everything from piling into a single file.
Now create src/my_ml_project/api/main.py, which is the whole service in four lines:
from fastapi import FastAPI

from my_ml_project.api.routes import router

app = FastAPI()
app.include_router(router)
This is the file your server loads. It builds the app object and attaches your routes, and that's all it should ever do. Add more endpoints later and they become more routers, while this file stays about this size.
Step 5: Run it locally
From your project root:
uv run fastapi dev src/my_ml_project/api/main.pyThis starts the service on http://localhost:8000 and picks up code changes automatically while you're developing.
Two things worth knowing. You point the command at main.py, and FastAPI finds the app object inside it for you. And dev is the development mode: auto-reload on, reachable only from your machine. Its counterpart fastapi run is the production one, which is what goes in the Dockerfile later.
If you're wondering why your terminal says Uvicorn running, that's the server doing the actual work. The fastapi command just starts it for you.
To check that it works, open http://localhost:8000/docs in your browser. FastAPI generates an interactive UI where you can fill in the request fields and test the endpoint directly. No Postman, no curl, no extra tools.
Step 6: Test it from code
The docs UI is convenient, but the real point of a service is that other code can call it. Here's what that looks like (uv add requests first):
import requests

response = requests.post(
    "http://localhost:8000/predict",
    json={"age": 35, "income": 75000.0, "tenure_months": 24}
)

print(response.json())
# {'churn_probability': 0.23, 'risk_band': 'low'}
That's the loop. Send JSON, get a prediction back. Anyone on your team, or any other service, can now call this model the same way.
💡 The validation you got "for free" isn't a small thing. Try sending
{"age": "thirty-five"}to the endpoint. FastAPI rejects it with a clear error pointing at exactly which field was wrong, and your model never gets called with bad data.
Hardening the service for real use
Everything above runs fine on your laptop. Making the service reliable enough to be called by real users (or by another service) takes a few additional habits that data scientists often skip and later regret. All three below are edits to routes.py, since they're about how your endpoints behave.
Log what your service is doing
Every endpoint should log the inputs it received, the predictions it returned, and any errors that occurred. When something goes wrong in production (and it will), these logs are how you debug.
import logging

logger = logging.getLogger(__name__)

@router.post("/predict", response_model=PredictionResponse)
def predict(request: PredictionRequest):
    logger.info(f"Prediction request: age={request.age}, tenure={request.tenure_months}")
    features = [[request.age, request.income, request.tenure_months]]
    probability = float(model.predict_proba(features)[0][1])
    logger.info(f"Prediction returned: probability={probability:.3f}")
    # ... rest of the logic
Don't log raw payloads if they contain anything sensitive (user PII, financial data). Log the metadata you'd need to debug, not the data itself.
Handle errors explicitly
By default, if your endpoint raises an exception, FastAPI returns a 500 Internal Server Error with no useful information. That's bad. The client doesn't know what went wrong, and you've leaked the fact that something crashed without telling them what.
Catch known failure modes and return clear responses:
from fastapi import HTTPException

@router.post("/predict", response_model=PredictionResponse)
def predict(request: PredictionRequest):
    if request.tenure_months < 0:
        raise HTTPException(status_code=400, detail="Tenure cannot be negative")
    # ... rest of the endpoint
This returns a 400 Bad Request with a clear message, which is what a well-behaved API does.
Add a health check
Every production service needs an endpoint that says "I'm alive and working." Without this, infrastructure tools can't tell whether to keep your service running or restart it.
@router.get("/health")
def health_check():
    return {"status": "ok"}
Three lines. It's the smallest, highest-leverage thing you can add to a production service.
Packaging it for shipping with Docker
The service you just built has one limit. It runs on your laptop. That's it.
This is where Docker comes in. Everything we've done so far has been building the thing. Docker is the step where we package the thing so it can actually go somewhere: to a cloud server, to a CI pipeline, to a colleague's machine. The output of this step is a container, and that container is the artifact that gets deployed to whatever platform ends up hosting your model (AWS, GCP, Azure, Kubernetes, or a plain VM).
The moment someone else tries to run your service without Docker, they hit the same problem you fixed at the project level in Lesson 1: does the environment match? Which Python version? Which OS? Which system libraries? In Lesson 1 you made your project reproducible in code. Docker extends that reproducibility to the runtime your code runs in. Same Python, same libraries, same OS layer, everywhere.
What a container actually is (short intuition)
A container is "your installed environment plus your code, sealed together, that anyone can run without setup."
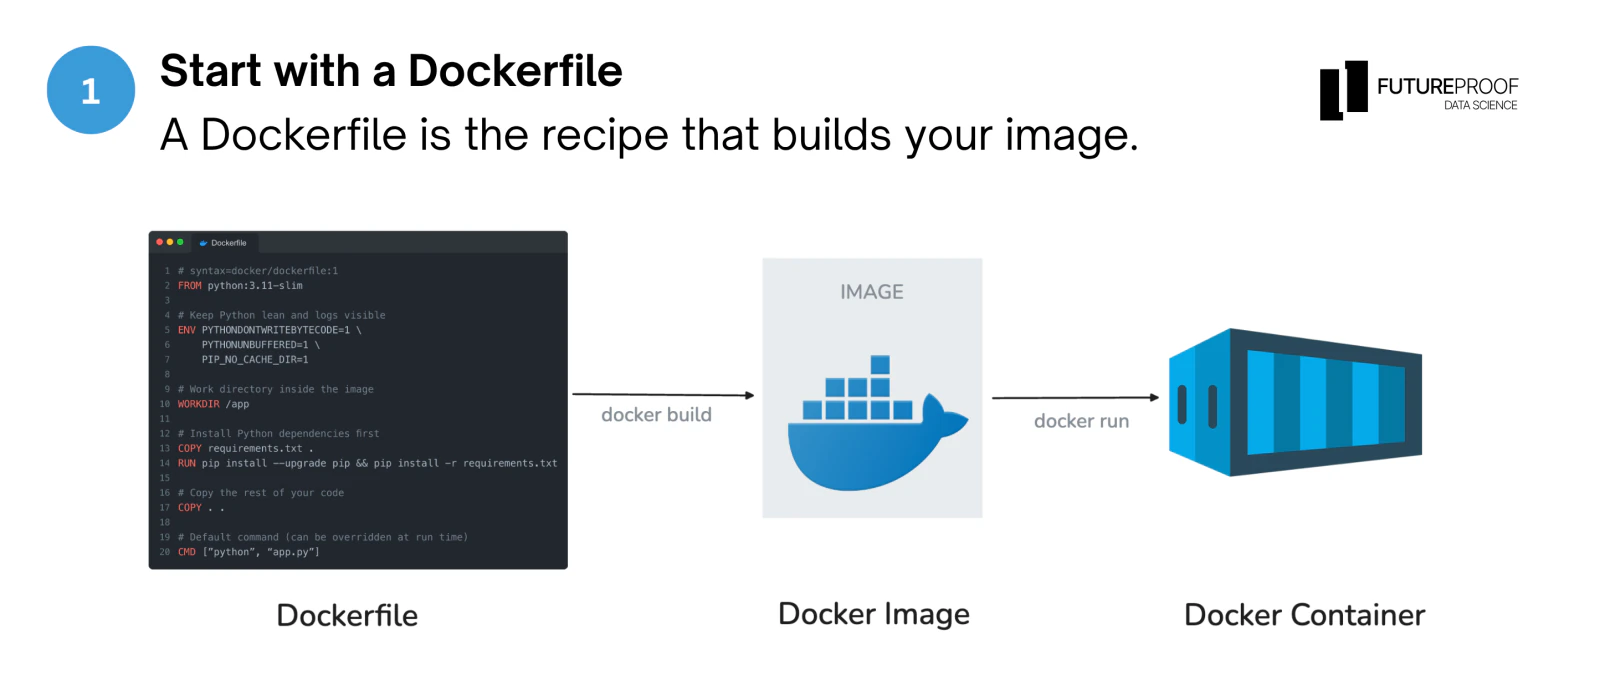
More precisely: it's a lightweight, isolated process that includes your app plus a minimal operating system layer with all the dependencies your app needs, packaged into a single image. When someone runs your container, they get exactly the environment you built it in. They don't need to install Python. They don't need to install your dependencies. They just run the container.
For a data scientist, the mental model that works: a container is what happens when uv sync and your code get packaged into one file that runs anywhere.
Writing your first Dockerfile
Create a file called Dockerfile at the root of your project (no extension):
# Start from a minimal Python image
FROM python:3.12-slim

# Install uv inside the container
COPY --from=ghcr.io/astral-sh/uv:latest /uv /uvx /bin/

# Set the working directory inside the container
WORKDIR /app

# Copy the project into the container
COPY . /app

# Install dependencies using uv, from your lockfile
RUN uv sync --frozen --no-cache

# Expose the port the service listens on
EXPOSE 8000

# Command to run when the container starts
CMD ["uv", "run", "fastapi", "run", "src/my_ml_project/api/main.py", "--port", "8000"]
A few things worth noticing:
FROM python:3.12-slimstarts from a small, official Python image. Your container inherits from this, so you don't have to install Python yourself.COPY --from=ghcr.io/astral-sh/uv:latestbrings uv into the container. Now Lesson 1's tooling works inside the container the same way it works on your laptop.RUN uv sync --frozen --no-cacheinstalls your exact dependencies fromuv.lock. Same lockfile, same versions, everywhere.CMD [...]is what runs when the container starts. It'sfastapi runhere, not thefastapi devfrom Step 5: no auto-reload, and it listens on0.0.0.0so the service is reachable from outside the container. Both come free with production mode, so there are no extra flags to pass.
Building and running the container
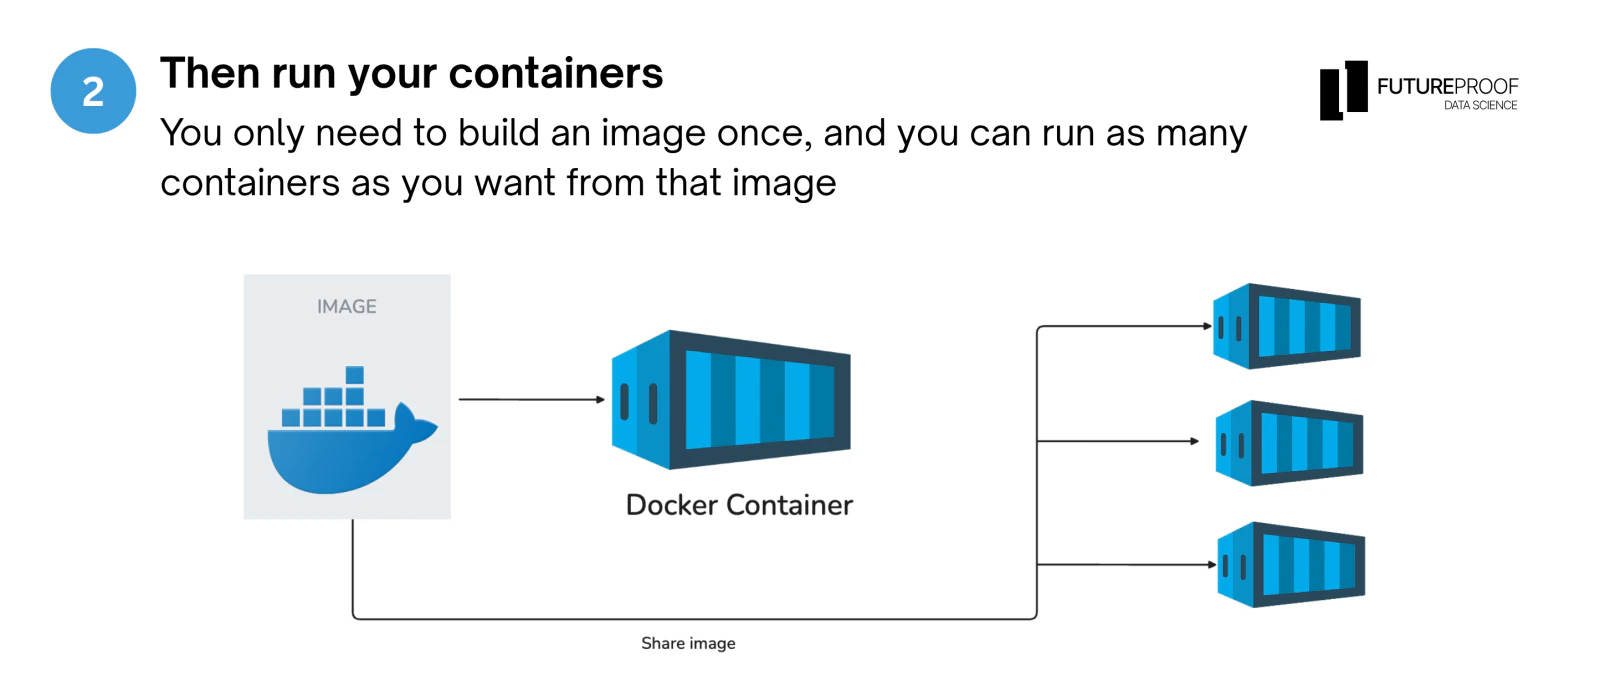
Build the image:
docker build -t my-ml-service .That's your service, packaged. Run it:
docker run -p 8000:8000 my-ml-serviceThe -p 8000:8000 flag forwards port 8000 from the container to port 8000 on your machine. Open http://localhost:8000/docs and you should see the same interactive FastAPI docs as before.
Except now, this exact same setup runs the same way on any machine with Docker installed. No Python version mismatch. No missing libraries. No "works on my machine."
💡 The connection to Lesson 1: your
pyproject.tomlanduv.lockare what make the Dockerfile short. Without them, the Dockerfile would need to pin every dependency by hand. With them,uv sync --frozendoes all the work in one line. This is why we spent Lesson 1 on project structure. Everything downstream gets simpler because of it.
Docker Compose (for local development)
Once you have a Dockerfile, one more small file makes local development smoother: docker-compose.yml at the project root.
services:
  api:
    build: .
    ports:
      - "8000:8000"
    volumes:
      - ./src:/app/src
    environment:
      - PYTHONUNBUFFERED=1
Now you can start the service with:
docker compose upThe volumes line mounts your local src/ folder into the container, so code changes on your machine are reflected inside the container without rebuilding. Small quality-of-life win for development.
Try it on your own
I put together a small starter repo with a churn model you train in one command and a working FastAPI service (prediction endpoint, Pydantic schemas), plus a client script that calls it.
Here is a quick video walkthrough to give you a general overview:
Clone it and:
- Train the model with
uv run scripts/train_model.py. - Start the service with
uv run fastapi dev src/my_ml_project/api/main.py, then openhttp://localhost:8000/docsto see the interactive docs FastAPI generates for free. - Call it by running
uv run client/call_predict.pyin a second terminal. That script stands in for whatever calls your service in production, which is why it lives outsidesrc/. Watch the prediction come back and the request appear in the server logs. - Add the
/healthendpoint yourself. There's aTODOinsrc/my_ml_project/api/routes.py. Implement it, then confirmhttp://localhost:8000/healthreturns{"status": "ok"}.
Get the starter repo on GitHub
The whole thing takes 5 to 10 minutes. Once it's running, containerizing it with the Dockerfile you saw in this lesson is a natural next step.
Final thoughts
Coming out of Lesson 1, your model lived in a folder. Now you've turned it into a service and packaged that service into a container. That container is the artifact that actually ships. It's what gets pushed to a registry, pulled down by a cloud runtime, and run on a server that answers real requests.
You haven't deployed it yet, and that's fine. That's Lesson 4's job (we'll wire up the pipeline that automates the deploy). This lesson's job was building the thing that gets deployed.
If you take away one thing from this lesson, let it be this: a model on your laptop is a prototype. A model in a container is a product.
💡 If you're earlier in your career: don't worry about production hardening yet (autoscaling, load balancing, TLS, secrets management). Just get to the point where you can
docker runyour service on your machine and hit the/predictendpoint. That's the foundation. Everything else stacks on top.
Next up: tracking your experiments so your future self can reproduce them. Because a service that can't tell you which model version is running isn't really trustworthy.
If you'd rather do this end to end with support and feedback, take a look at the ML in Production bootcamp.