Your Future SelfNeeds to Reproduce This:Experiment Trackingwith MLflow

A quick honesty check to start…
If someone walked up to you right now and asked "which model is running in production, and how was it trained?", could you actually answer?
Not vaguely. Specifically. Which version, trained on what data, with which hyperparameters, producing which metrics, on which date.
For most data scientists, the honest answer is no. And it's not a personal failing. It's the default state.
In this lesson, we fix it. By the end of this article, every model you train will have a permanent, versioned record. You'll know exactly what produced it, what it was trained on, and how it performed. And you'll be able to promote or roll back specific versions without touching your code.
The tool for this is MLflow. Let's get to it!
Why "which model is in production?" is a question you probably can't answer right now
You've spent the previous two lessons building the ML project structure (Lesson 1) and turning your model into a callable, shippable service (Lesson 2). But right now, if that service is running in production, you can't tell which trained model is actually inside it. That's a problem. It means you can't debug regressions, can't compare model versions, and can't roll back with any confidence.
Here's the failure mode most data scientists live with, whether they realize it or not.
You train a model. It works. You save it as model.pkl. Or model_v2.pkl. Or model_final_final_actually_final.pkl.
A few weeks later, you train another version. Maybe you tried a different feature set, or bumped the learning rate, or used a bigger training window. You save that one too. Somewhere. Probably not in the same folder.
Fast forward six months. Someone in leadership asks:
- "Why did our churn predictions look different last quarter?"
- "Can we go back to the version that was live in March?"
- "What data was used to train the model currently in production?"
You don't know. And you can't easily find out. The trained model is a binary file with no metadata. The training code has probably been rewritten since. The data has probably changed. Even if you think you can retrace the steps, you can't guarantee reproducibility.
This isn't a rare edge case. It's the default state, and it's the reason model deployments feel scary.
💡 Even if you're solo, this bites. Your future self is essentially another data scientist: someone who doesn't remember the choices you made or why. Six months from now, when a model in production is underperforming, you'll be doing the reconstruction work as if a stranger built it. And when you're on a team, it gets worse. Everyone remembers their own experiments but nobody sees each other's.
MLflow fixes this problem at its root.
What MLflow actually is (and how it became the industry standard)
MLflow is an open-source system for tracking, versioning, and managing ML experiments and models. It was originally built at Databricks in 2018 and has since become the default tool for ML teams across the industry. It's used at scale by companies like Toyota, Booking.com, and Meta.
Three things about MLflow are worth understanding upfront:
1. It's tool-agnostic: MLflow doesn't care whether you're using scikit-learn, PyTorch, XGBoost, TensorFlow, or LightGBM. It logs runs from all of them the same way. This matters because it means you can standardize on MLflow regardless of what modeling frameworks your team uses (or switches between).
2. It has four connected components, but you only need two for this lesson:
- Tracking: logs parameters, metrics, artifacts, and code for every training run
- Registry: versions and lifecycles your production-ready models
- Projects: packages code for reproducibility (out of scope for this lesson)
- Models: a standard format for saving models (used internally by tracking and registry)
We're going to focus on Tracking and Registry. Those two solve 90% of the reproducibility problem.
3. It has a web UI: Once you start tracking runs, you can browse them, compare them, and search them from a browser. This is where MLflow "clicks" for most data scientists. The moment you can see all your experiments in one interface, the value becomes obvious.
Tracking your first experiment
Let's take the churn model project from Lesson 2 and instrument it. Time from zero to your first tracked run: about 10 minutes.
Step 1: Install MLflow
From your project directory (the one you set up with uv in Lesson 1):
uv add mlflowThat's it. MLflow ships as a single Python package that includes both the tracking library and the local UI server.
Step 2: Wrap your training code in an MLflow run
Open your training script (something like src/my_ml_project/train.py). The pattern is:
import mlflow
import mlflow.sklearn
from sklearn.ensemble import RandomForestClassifier
from sklearn.metrics import accuracy_score, f1_score

def train_churn_model(X_train, y_train, X_val, y_val, n_estimators=100, max_depth=10):
    with mlflow.start_run():
        # Log hyperparameters
        mlflow.log_param("n_estimators", n_estimators)
        mlflow.log_param("max_depth", max_depth)

        # Train the model
        model = RandomForestClassifier(
            n_estimators=n_estimators,
            max_depth=max_depth
        )
        model.fit(X_train, y_train)

        # Log metrics
        preds = model.predict(X_val)
        mlflow.log_metric("accuracy", accuracy_score(y_val, preds))
        mlflow.log_metric("f1", f1_score(y_val, preds))

        # Log the model itself
        mlflow.sklearn.log_model(model, "model")

        return model
A few things worth noticing:
mlflow.start_run(): creates a new run. Everything inside thewithblock gets logged to that run.log_param: logs anything that describes how you trained the model. Hyperparameters, feature choices, data version.log_metric: logs anything that describes how well it performed. Accuracy, F1, AUC, RMSE.log_model: saves the trained model itself as an artifact tied to the run.
Step 3: What to actually track (a practical checklist)
The minimum you should log for every run:
- Parameters: every hyperparameter, plus the feature set version and the training data version
- Metrics: your headline metric (whatever the business cares about) plus a few validation metrics
- The model itself: so you can reload the exact model later, not just recreate one that behaves similarly
- A tag identifying who ran it:
mlflow.set_tag("author", "andres")(trivial to add, saves hours later)
The fuller version, for when you're serious about reproducibility:
- The training data as an artifact (or a reference to its version in a data lake)
- The code version (Git commit hash:
mlflow.log_param("git_commit", ...)) - The environment (a
requirements.txtsnapshot oruv.lock) - Plots: confusion matrix, feature importance, calibration curve
- A short description:
mlflow.set_tag("mlflow.note.content", "First run with new fraud features")
You don't need all of this right now. Start with the minimum. Add the rest as it starts mattering.
Step 4: See it in the UI
Run your training script once. Then, from the same directory:
mlflow uiOpen http://localhost:5000 in your browser. You'll see your run listed, with all the parameters and metrics you logged.
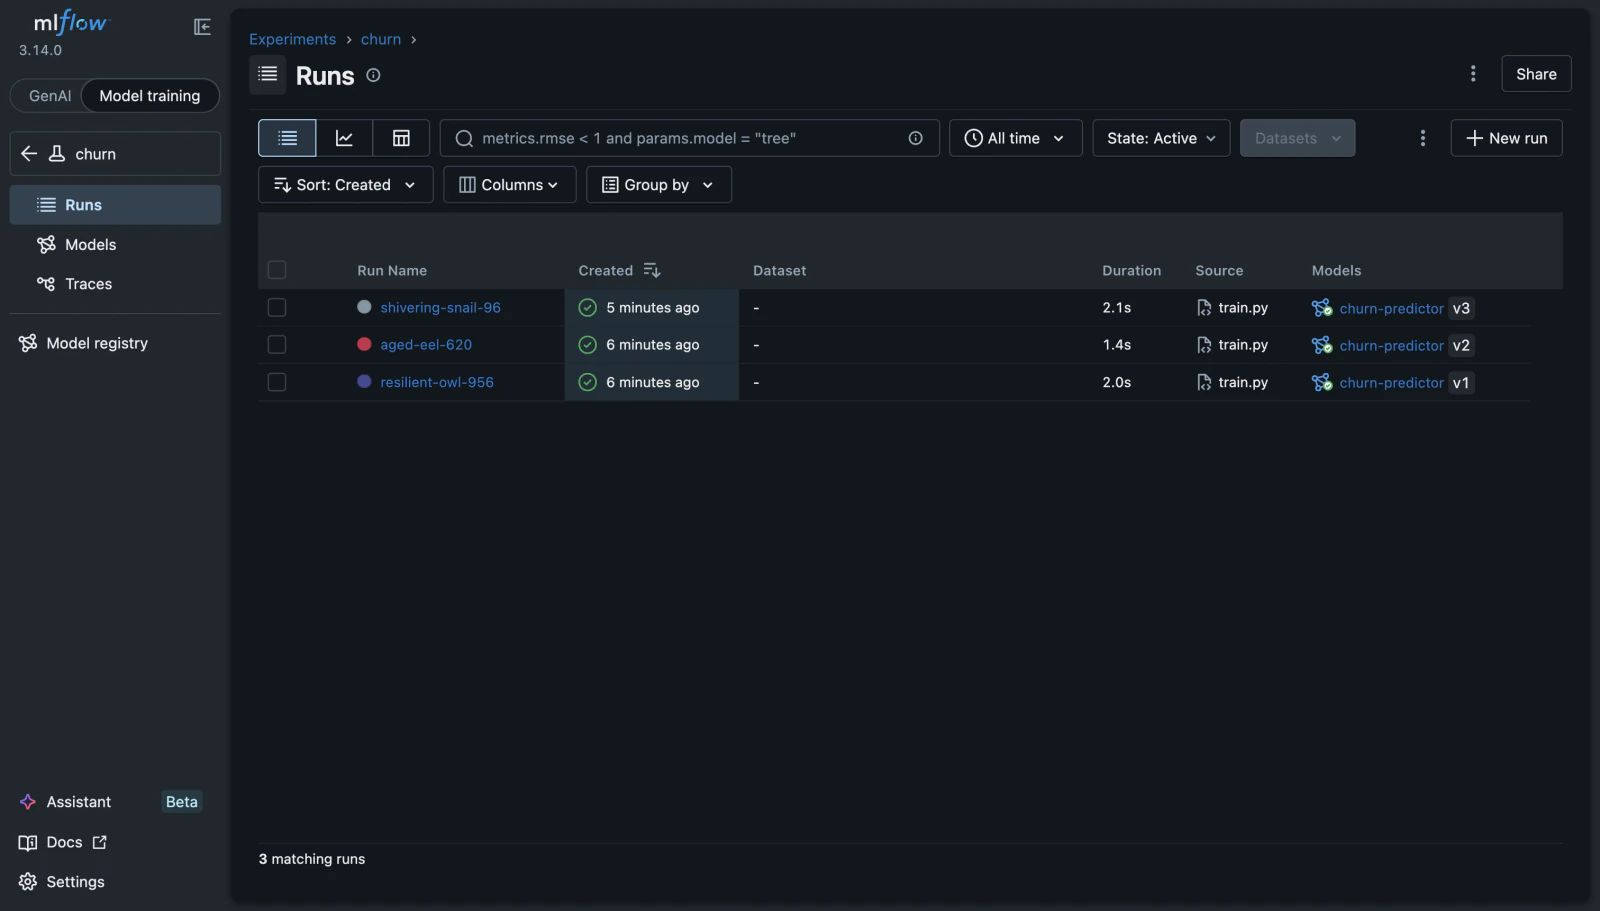
Train the model a few more times with different hyperparameters. Each run gets its own row. You can sort by any metric, filter by parameters, and click into any run to see the full details, including the saved model artifact.
This is the moment MLflow clicks. Instead of wondering which run produced the model in your models/ folder, you can just look. Every training run is a permanent, searchable record.
The model registry: from experiment to production
Tracking runs is half the value. The other half is the model registry, which is what takes MLflow from "nice notebook helper" to "actually useful for shipping models."
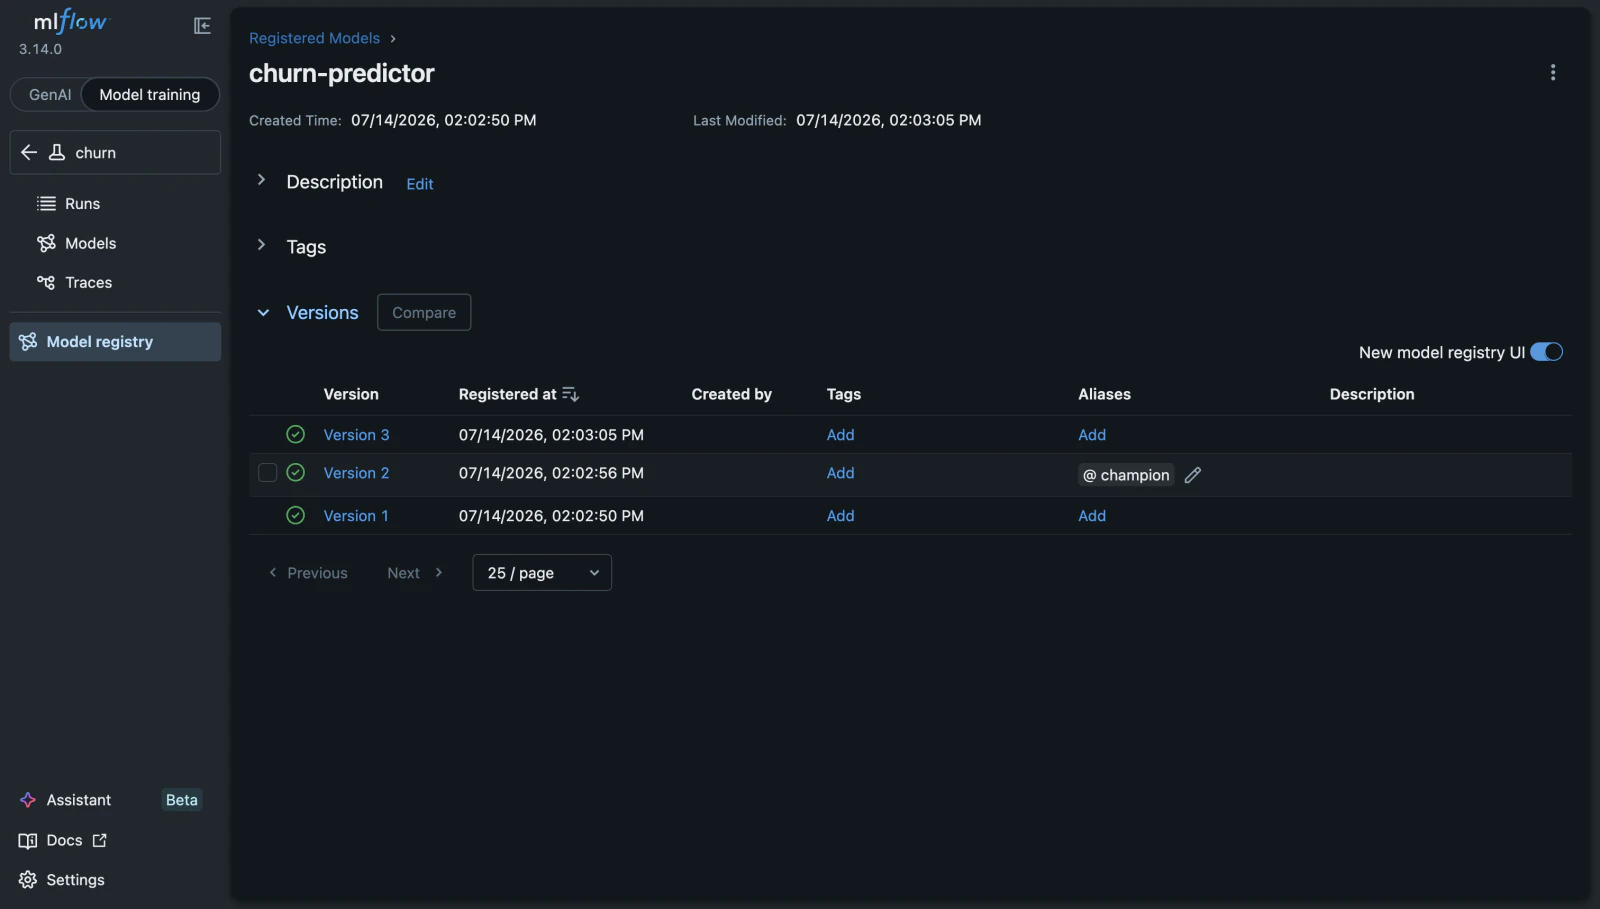
The registry is a versioned store of your production-ready models. Think of it as GitHub, but for trained models. Every model has:
- A name (like
churn-predictororfraud-detector) - Versions (v1, v2, v3, etc.)
- Aliases that tell your service which version to use (
@championfor the current production model,@challengerfor the one you're testing) - Optional descriptions, tags, and metadata
Registering a model
Once you've trained a run you're happy with, register the model:
import mlflow

# Get the run you want to register
run_id = "abc123..."  # from the MLflow UI

# Register the model
model_uri = f"runs:/{run_id}/model"
mlflow.register_model(model_uri, name="churn-predictor")
That creates version 1 of churn-predictor in the registry. Every subsequent registration creates a new version (v2, v3, and so on).
Aliases: how you decide which version is "production"
In older versions of MLflow, you'd promote models through fixed stages (Staging, Production, Archived). The modern pattern is aliases, which are more flexible and reflect how teams actually work.
You assign aliases like:
@champion: the current production model@challenger: the model you're testing against production@baseline: a reference version for comparison
Setting an alias is one line:
client = mlflow.tracking.MlflowClient()
client.set_registered_model_alias(
    name="churn-predictor",
    alias="champion",
    version=3
)
Now version 3 is your champion. Your service (from Lesson 2) can load whichever model is currently the champion without knowing the specific version number.
Loading a registered model in your service
Remember Lesson 2's FastAPI service? It loads the model like this:
import joblib
model = joblib.load("models/churn_model.pkl")
Replace that with:
import mlflow
model = mlflow.pyfunc.load_model("models:/churn-predictor@champion")
That's the connection to Lesson 2. The service code barely changes. But now, when you want to promote a new model, you don't touch the service at all. You just move the @champion alias in the registry, and the service picks it up on its next restart.
Rolling back is just as clean. Move the @champion alias back to the previous version. No rebuild, no redeploy of the service itself.
This is what "trustworthy ML deployment" actually looks like at the plumbing level.
Where the artifacts get stored (and why cloud matters eventually)
MLflow needs somewhere to store two kinds of things:
- Run metadata (parameters, metrics, tags) goes into a database
- Artifacts (the actual saved models, plots, data samples) go into a filesystem or object store
By default, MLflow stores everything on your local disk (in a folder called mlruns/). That works fine for a solo project on your laptop.
Where local storage stops being enough:
- Your service (from Lesson 2) runs in a container on a server. That container needs to load the model from somewhere the server can reach. Your laptop's
mlruns/folder isn't reachable. - Someone else on your team needs to see your runs.
- Your CI pipeline (Lesson 4) needs to pull the latest champion model to deploy it.
The standard solution is object storage: S3 (AWS), GCS (GCP), or Azure Blob. You point MLflow at the bucket, and every artifact you log gets written there instead of to your local disk. Everyone with access to the bucket can now load models from the registry.
You don't need to set this up right now. Local storage is fine while you're learning. But know that this is the next step, and it's what makes MLflow work in a team or production setting.
How this connects to Lesson 2's service and Lesson 4's pipeline
Zoom out for a moment. Look at what you've built across the last three days:
- Lesson 1 gave you a project that runs anywhere, with dependencies locked down
- Lesson 2 turned that project's model into a callable, containerized service
- Lesson 3 gave that service a versioned model source, so you know which specific model is running and can change it without changing the code
Lesson 2's container hasn't changed. Only how it loads the model. The Dockerfile you built there is unchanged. Your FastAPI code is unchanged. What changed is that joblib.load(...) became mlflow.pyfunc.load_model(...), and now your model reference points at the registry instead of at a local file.
In Lesson 4, we wire up the automation that makes this whole thing hands-off. When a new model gets promoted to @champion, the pipeline will automatically rebuild and redeploy your container. You'll stop pushing containers manually. The registry will drive deployment.
This lesson is the invisible layer that makes Lesson 4 possible.
Try it on your own
I put together a small repo with the churn model already wired up to MLflow: training logs every run and registers a new model version, and a predict script loads whatever is currently @champion. Clone it and:
- Log a few runs with
uv run scripts/train.py, then again with different--n-estimatorsand--max-depth. Each one registers a new version. - Open the MLflow UI with
uv run mlflow ui --backend-store-uri sqlite:///mlflow.dband compare the runs and versions side by side. - Promote a version to champion with
uv run scripts/promote.py --version 2. - Predict from the champion with
uv run scripts/predict.py. Then promote a different version and rerun it.
Get the starter repo on GitHub
That last step is the moment the value clicks: the predict script never names a version, it just asks for @champion, so swapping models or rolling back a bad one is a one-line alias change instead of a redeploy. That's what companies use dedicated ML platforms to enable, and you did it with one open-source tool. The whole thing takes about 15 minutes.
Final thoughts
You've closed the loop between "training a model" and "knowing exactly which model is running." That's the invisible layer beneath every trustworthy ML deployment, and most data scientists don't have it.
If you take one thing from this lesson, let it be this: an untracked model in production is a liability, not an asset. You can't debug it, you can't reproduce it, and you can't roll back with confidence. Adding tracking is the smallest possible fix for the biggest possible category of ML production problems.
💡 If you're earlier in your career: don't get overwhelmed by everything MLflow can do. Start with the tracking piece only. Wrap one training run in
mlflow.start_run(), log five parameters and two metrics, and open the UI. That single act of seeing your experiment show up in a searchable interface changes how you work. The registry and the aliases come later.
In Lesson 4: deployment isn't a moment, it's a pipeline. Because manually pushing containers and manually promoting models isn't shipping. It's ceremony. That's where the automation kicks in.
If you'd rather do this end to end with support and feedback, take a look at the ML in Production bootcamp.